HOW TO fit parrot kit and dash cam to grand voyager premium sound system nav mki9200
#1
 09-14-2014, 06:07 PM


Not had my Voyager long and I wanted to fit a parrot kit and a dash cam. Thought I'd take a few photo's along the way to help others.
I have a March 2005 Chrysler Grand Voyager Limited XS fitted with (standard I think) sat nav, 6 disc dvd changer with overhead screen, and premium sound system (no infinity logo's on the speaker grills but its written on the back of the speakers) with a single amp hidden above the rear right wheel.
I purchased a Parrot Mki9200 with the colour screen.
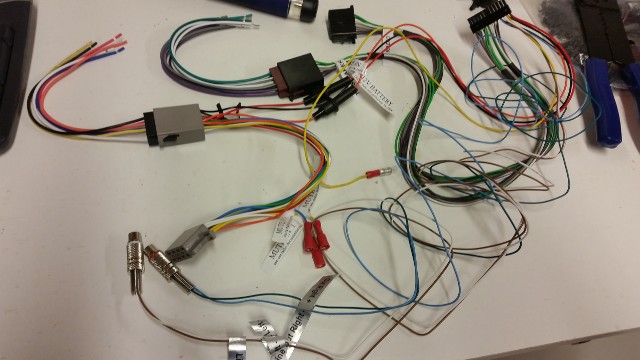
I soldered a pair of RCA sockets to the line out cables (they ought to have these fitted ready). Halfords said the correct SOT lead would be �50 so I thought I'd do it myself. I bought some ISO plugs with bare wire from Maplins to save me cutting into the parrots wireing harness.
The head unit does not have a standard ISO block, but has all the usual connections. However, the usual speaker outputs don't go anywhere. Instead, a data signal is sent to the amp, which then sends a seperate output to each of the 8 speakers.
The parrot kit is designed to connect between the amp (seperate or built into headunit) and the speakers. When on a phone call or playing music, it will disconnect the speakers from the amp and use its own internal amp to power the speakers and play it's own sound. This is a good solution for most OEM head units, unless the have a premium sound system which is better than the Parrots own amp. The only other solution is to use the headunits Aux in jack.
The 6dvd changer has a set of RCA inputs on the front. If you don't have a cd changer, you can buy one or get a Connects2 adapter to give you an aux in which pretends to be a cd changer.
There is no need to touch any of the wires going into the back of the stereo. The parrot has a mute signal which you may use if you wish. This causes the head unit to mute all speakers when a call is in place. If you are using the parrots own amp it will also cause the head unit to mute when the parrot is playing music, although this is pointless as the parrot disconnects the speakers anyway (some headunits might pause your cd). This can be changed in the parrot settings to mute only on phone calls for when you are using the aux in for music (aux in only does music - phone calls always via the parrots amp direct to speakers). I have only wired my right door speaker into the parrot kit. This means that when a phone call is in place, my right door speaker stops playing audio from my car stereo (amp) and instead plays the audio from my phone call. The other speakers carry on as normal. My primary reason for this is so I can still hear sat nav instructions during a phone call (which lazily come through the passenger speaker for left hand drive cars). It also means I can keep listening to the radio during a phone call through the other speakers and adjust the volume independantly to the phone call volume on my parrot kits remote. If you do want to use the mute cable, it connects to pin 15 on your head unit, even if like mine that pin is labelled as NC.

It's much easier to take power feeds from your accessory sockets than the headunit loom. One socket has an ignition feed, the other socket has a permanent feed and your negative. I soldered RCA sockets to the parrots wires and then used an RCA plug to plug to go to the aux in, so it can be easily replaced when damaged.
The speaker connection has to take place between the amp in the back and the speaker in the drivers door. I didn't want my phone call being played through the front passenger speaker so I simply didn't connect it. The easiest place I could find to make the connection is under the trim just before the cable goes through to the door. It can then be safely run above the pedals to the parrot box.
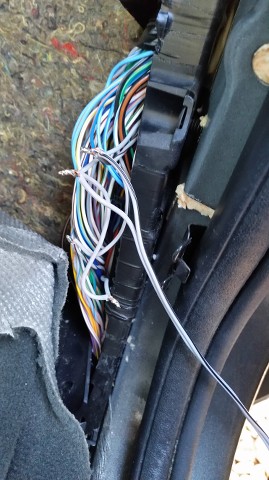
Its very hard to get to the correct wire as its a thick loom without much slack. The speaker cables to the drivers door speaker is grey+ and grey/brown-. I just patched the parrots output into this feed as shown in the picture, but you need to send the feed from the amp into the parrot kit, then its output back out to the speaker otherwise the phone call sound will clip and you have to use the mute feature. I forgot to take a new pic showing two cables. You could also use the left channel speaker in/out on the parrot kit for the right dash speaker to give better sound for your phone calls, but I chose not to. This is because I intend to reverse my left and right channels as they come out the amp so that my satnav voice is correctly sent to my 'right' speaker. When on a phonecall, the call will come through the door speaker (which alone is very loud and clear) and then the satnav voice will still come through quietly from the dash speaker if a call is in place.
I stuck the microphone to the bottom of the rear view mirror and stuck the remote to the door above the electric window switches. Test everything thoroughly before putting the dash back together.
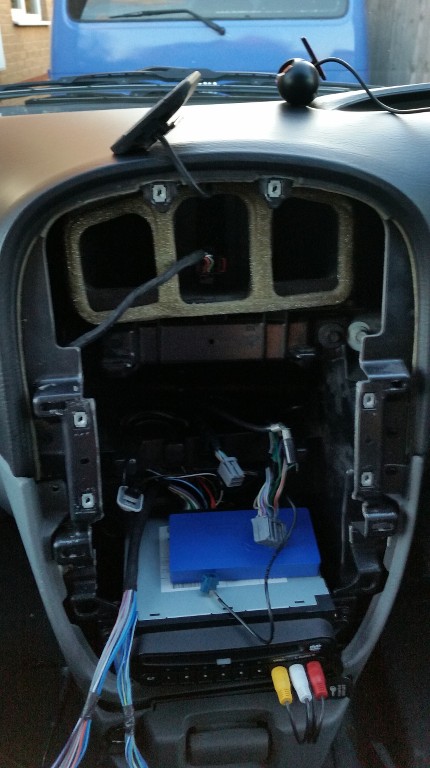
While everything was out, I also installed a dash camera. I got a cheap one off eBay for �25 with no screen. I wired its video out to the same RCA patch lead going to my aux in. Because the dvd changer auto activates the aux in when it senses a signal, you have to keep the cable unplugged unless you want to view the camera. You only need to view the camera feed for initial alignment and settings adjustments. Also for playback, but do that on your computer. I routed the cable to come out the dash just above the slide out ash tray, so the plug can be kept in the drawer when not being used. The audio can be left permanently plugged in as it only detects a signal when music is playing.
I wanted my camera to record 24/7 instead of just when I'm driving, to protect my car while its parked. But obviously I didn't want a flat battery. I purchased a battery guard from Maplins which monitors the voltage and disconnects the load when it drops to the voltage you select. I wierd this inline with the permanent accessory socket so that I can leave my phone charging or my fridge running inside the car while its locked without getting a flat battery. I then also connected the cameras ignition to this output so that the camera doesn't know when the engine stops and carrys on recording when parked. But I connected its permanent live before the battery guard, so that when the battery voltage is low the camera isnt disconnect, it still has power to save the current clip and then shut itself down. I also intend to use the battery guards feed to signal on an invertor I intend to fit behind the trim next to the amp in the rear so again I can keep this running when the car is locked up without fear of flattening the battery. I'm about to fit a tow bar so I might also use it for the split charge relay for caravan so it has power while parked (not just when the engine is running), but I need to look into that more.
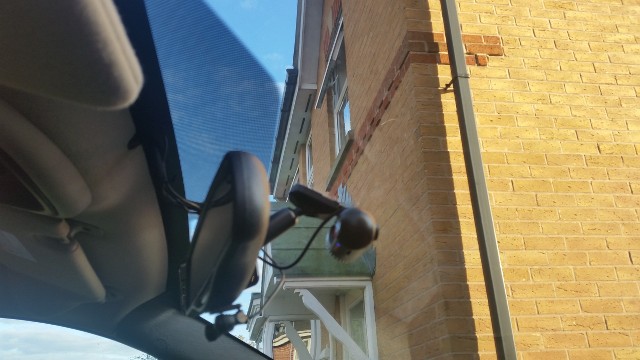
I stuck the camera just below the rear view mirror so that the driver (car theif) cannot see it.
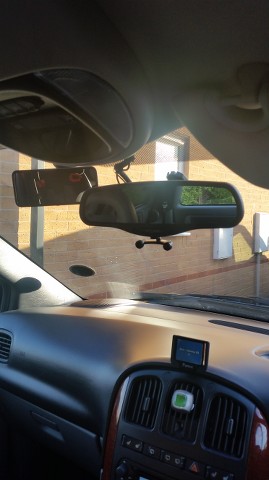
It records in HD on upto a 32GB micro sd card. However, that can only store about 3.5 hours of footage (a bit pointless for my 24/7 idea). Lowest 320x240 gets about 6 hours. The camera has a motion detector which I thought would solve this issue, but it seems to be recording constantly regardless of motion being detected. I have a feeling that maybe this is meant for when the ignition is off, meaning my ignition feed needs to be a real one and not just off the battery guard. Need to experiment. I have also fitted a set of LED interior lights to further save my battery. They don't get hot and actually look fantastic too! In my earlier picture you can see I also fitted a new trailing accessory socket behind the dash. I have my phone charger plugged into that and then the wire comes out of the A pillar alongside my windscreen phone cradle (I hate having wires running round my steering wheel and in front of my dash!). I also ran microphone and camera cables up this right A pillar as they can easily be tucked under the door seal and headlining.
Here is a recording in 720

My camera is also faulty in that it is giving a mirror image, as if for a reversing camera. I am waiting to recieve my replacement. I'm going to fix this camera pointing out the rear window at the back so that I can record what's happening behind my car too. I might also get a little screen showing this rear cameras feed which is only powered when in Reverse gear, so that I have a reversing camera doubling up as a rear dash cam! I will get a screen which doubles as a rear view mirror and fasten it to my second rear view mirror which I use to keep an eye on the kids.
Overall though I'm really happy with the results and I love the parrot kit. I just wish it read out text messages - it can read out my contacts names and the menu's so it already has text to speech capabilities. Hope this helps. Sorry if its too long or not detailed enough, I don't write these often.
I have a March 2005 Chrysler Grand Voyager Limited XS fitted with (standard I think) sat nav, 6 disc dvd changer with overhead screen, and premium sound system (no infinity logo's on the speaker grills but its written on the back of the speakers) with a single amp hidden above the rear right wheel.
I purchased a Parrot Mki9200 with the colour screen.
I soldered a pair of RCA sockets to the line out cables (they ought to have these fitted ready). Halfords said the correct SOT lead would be �50 so I thought I'd do it myself. I bought some ISO plugs with bare wire from Maplins to save me cutting into the parrots wireing harness.
The head unit does not have a standard ISO block, but has all the usual connections. However, the usual speaker outputs don't go anywhere. Instead, a data signal is sent to the amp, which then sends a seperate output to each of the 8 speakers.
The parrot kit is designed to connect between the amp (seperate or built into headunit) and the speakers. When on a phone call or playing music, it will disconnect the speakers from the amp and use its own internal amp to power the speakers and play it's own sound. This is a good solution for most OEM head units, unless the have a premium sound system which is better than the Parrots own amp. The only other solution is to use the headunits Aux in jack.
The 6dvd changer has a set of RCA inputs on the front. If you don't have a cd changer, you can buy one or get a Connects2 adapter to give you an aux in which pretends to be a cd changer.
There is no need to touch any of the wires going into the back of the stereo. The parrot has a mute signal which you may use if you wish. This causes the head unit to mute all speakers when a call is in place. If you are using the parrots own amp it will also cause the head unit to mute when the parrot is playing music, although this is pointless as the parrot disconnects the speakers anyway (some headunits might pause your cd). This can be changed in the parrot settings to mute only on phone calls for when you are using the aux in for music (aux in only does music - phone calls always via the parrots amp direct to speakers). I have only wired my right door speaker into the parrot kit. This means that when a phone call is in place, my right door speaker stops playing audio from my car stereo (amp) and instead plays the audio from my phone call. The other speakers carry on as normal. My primary reason for this is so I can still hear sat nav instructions during a phone call (which lazily come through the passenger speaker for left hand drive cars). It also means I can keep listening to the radio during a phone call through the other speakers and adjust the volume independantly to the phone call volume on my parrot kits remote. If you do want to use the mute cable, it connects to pin 15 on your head unit, even if like mine that pin is labelled as NC.
It's much easier to take power feeds from your accessory sockets than the headunit loom. One socket has an ignition feed, the other socket has a permanent feed and your negative. I soldered RCA sockets to the parrots wires and then used an RCA plug to plug to go to the aux in, so it can be easily replaced when damaged.
The speaker connection has to take place between the amp in the back and the speaker in the drivers door. I didn't want my phone call being played through the front passenger speaker so I simply didn't connect it. The easiest place I could find to make the connection is under the trim just before the cable goes through to the door. It can then be safely run above the pedals to the parrot box.
Its very hard to get to the correct wire as its a thick loom without much slack. The speaker cables to the drivers door speaker is grey+ and grey/brown-. I just patched the parrots output into this feed as shown in the picture, but you need to send the feed from the amp into the parrot kit, then its output back out to the speaker otherwise the phone call sound will clip and you have to use the mute feature. I forgot to take a new pic showing two cables. You could also use the left channel speaker in/out on the parrot kit for the right dash speaker to give better sound for your phone calls, but I chose not to. This is because I intend to reverse my left and right channels as they come out the amp so that my satnav voice is correctly sent to my 'right' speaker. When on a phonecall, the call will come through the door speaker (which alone is very loud and clear) and then the satnav voice will still come through quietly from the dash speaker if a call is in place.
I stuck the microphone to the bottom of the rear view mirror and stuck the remote to the door above the electric window switches. Test everything thoroughly before putting the dash back together.
While everything was out, I also installed a dash camera. I got a cheap one off eBay for �25 with no screen. I wired its video out to the same RCA patch lead going to my aux in. Because the dvd changer auto activates the aux in when it senses a signal, you have to keep the cable unplugged unless you want to view the camera. You only need to view the camera feed for initial alignment and settings adjustments. Also for playback, but do that on your computer. I routed the cable to come out the dash just above the slide out ash tray, so the plug can be kept in the drawer when not being used. The audio can be left permanently plugged in as it only detects a signal when music is playing.
I wanted my camera to record 24/7 instead of just when I'm driving, to protect my car while its parked. But obviously I didn't want a flat battery. I purchased a battery guard from Maplins which monitors the voltage and disconnects the load when it drops to the voltage you select. I wierd this inline with the permanent accessory socket so that I can leave my phone charging or my fridge running inside the car while its locked without getting a flat battery. I then also connected the cameras ignition to this output so that the camera doesn't know when the engine stops and carrys on recording when parked. But I connected its permanent live before the battery guard, so that when the battery voltage is low the camera isnt disconnect, it still has power to save the current clip and then shut itself down. I also intend to use the battery guards feed to signal on an invertor I intend to fit behind the trim next to the amp in the rear so again I can keep this running when the car is locked up without fear of flattening the battery. I'm about to fit a tow bar so I might also use it for the split charge relay for caravan so it has power while parked (not just when the engine is running), but I need to look into that more.
I stuck the camera just below the rear view mirror so that the driver (car theif) cannot see it.
It records in HD on upto a 32GB micro sd card. However, that can only store about 3.5 hours of footage (a bit pointless for my 24/7 idea). Lowest 320x240 gets about 6 hours. The camera has a motion detector which I thought would solve this issue, but it seems to be recording constantly regardless of motion being detected. I have a feeling that maybe this is meant for when the ignition is off, meaning my ignition feed needs to be a real one and not just off the battery guard. Need to experiment. I have also fitted a set of LED interior lights to further save my battery. They don't get hot and actually look fantastic too! In my earlier picture you can see I also fitted a new trailing accessory socket behind the dash. I have my phone charger plugged into that and then the wire comes out of the A pillar alongside my windscreen phone cradle (I hate having wires running round my steering wheel and in front of my dash!). I also ran microphone and camera cables up this right A pillar as they can easily be tucked under the door seal and headlining.
Here is a recording in 720
My camera is also faulty in that it is giving a mirror image, as if for a reversing camera. I am waiting to recieve my replacement. I'm going to fix this camera pointing out the rear window at the back so that I can record what's happening behind my car too. I might also get a little screen showing this rear cameras feed which is only powered when in Reverse gear, so that I have a reversing camera doubling up as a rear dash cam! I will get a screen which doubles as a rear view mirror and fasten it to my second rear view mirror which I use to keep an eye on the kids.
Overall though I'm really happy with the results and I love the parrot kit. I just wish it read out text messages - it can read out my contacts names and the menu's so it already has text to speech capabilities. Hope this helps. Sorry if its too long or not detailed enough, I don't write these often.
Last edited by dale_hopkinson; 09-14-2014 at 06:09 PM.

#3
09-24-2014, 11:48 AM
Ha ha you are correct! I tested this before I fixed its position, as the camera lens isn't squashed against the glass and looks down slightly, only the top 1/4 of the image isn't covered. I was happy with the compromise so that the camera isn't obvious to the driver.
#4
09-24-2014, 02:49 PM
After trying various locations I eventually ended up fixing my Mobius to the top right corner of the glass on the drivers side. It's swept by the wiper blade, hardly any cable is visible and it doesn't get in the way or distract me.
#5
10-16-2014, 01:52 AM

Hi,
and thanks for the detailed description.
My car is a Grand 2003 with the same sat nav and Infinity equipment, only difference is tha mine has a 6-disc cd changer.
Do you also experience the problem that when you stream music via bluetooth to the Parrot, the volume is much lower (even with playback device and the Parrot volume cranked up), and sound is coming only through the two front speakers?
The sound quality is thus not what I am used to, compared to radio or cd music from the Infinity system.
Best rgds
Michael
#6
10-16-2014, 06:30 PM
Hi you have to use an auxiliary input to get a good sound. My 6dvd changer has one on the front (the yellow red and white rca).
To do it direct to speakers would be a lower quality as you are cutting off the infinity amp and using the little amp inside the parrot kit. Also the parrot kit can only connect to 4 speakers. The amp has 8 outputs so you would have to do some fancy wiring or only use 4 speakers.
To do it direct to speakers would be a lower quality as you are cutting off the infinity amp and using the little amp inside the parrot kit. Also the parrot kit can only connect to 4 speakers. The amp has 8 outputs so you would have to do some fancy wiring or only use 4 speakers.
#7
05-05-2022, 03:21 PM

I've just fitted the parrot (the same as yours) I managed to get the sot lead off ebay �8 well pleased with the results, the phone works great (Sony Android) and I'm using a USB stick with just under 2000 of my favourite MP3's. The sounds great through all the speakers and it was all plug and play 

Thread
Thread Starter
Forum
Replies
Last Post
davtut
Chrysler Pacifica
38
07-14-2017 07:17 PM
andyb2000
Chrysler Voyager & Town & Country
2
05-10-2015 06:08 AM
dale_hopkinson
Chrysler Voyager & Town & Country
5
08-28-2014 05:01 PM