Chrysler Forum - Chrysler Enthusiast Forums
  • LOG IN
  • REGISTER
  • Forums
    • General Chrysler Forums
      • New Member Area
      • Off Topic
      • Brand News, Concepts & Rumors
      • Forum Issues
      • General Tech
    • Brand Review
      • Detailing
      • Interior
      • Audio/Visual Electronics
      • Exterior
      • Wheels and Tires
    • Chrysler Vehicles
      • Chrysler PT Cruiser
      • Chrysler 200 & Sebring
      • Chrysler Pacifica
      • Chrysler Crossfire & Crossfire SRT-6
      • Chrysler 300, 300C & 300C SRT-8
      • Chrysler Voyager & Town & Country
      • Chrysler Aspen
      • Past Chrysler Models
    • Racing / Recreational
      • Street/Strip
      • Professional Racing
    • Sponsoring Vendors
      • Nick Theis Cars
    • Chrysler Classifieds
      • The Chrysler Marketplace
      • Member Group And Special Buys
      • Archive - For Sale / Trade Classifieds
      • Archive - 'Wanted' Classifieds
      • Archive - Classified Feed
  • Marketplace
    • Vendor Directory
    • Become a Vendor
    • the Chrysler Marketplace
  • New Posts
  • Tools
    • Car Payment Calculator
    • Tire Rim Calculator
    • Recalls
    • Technical Service Bulletins (TSBs)
    • Members List
    • Live Feed
  • Gallery
  • View Dark Mode
    • Please register or login to enable Dark Mode.
  • Log In
  • Register
Chrysler Forum - Chrysler Enthusiast Forums
    • Threads
      • Advanced
Dark Mode

Please register or login to enable Dark Mode.

Log In

Forgot your Password?

By logging into your account, you agree to our Terms of Use and Privacy Policy, and to the use of cookies as described therein.
  • Recent
  • Commented
  • Albums
  • My Pictures

How to remove the crossover pipe from a Sebring 2.7L

dcotter0579
March 24, 2011
 6
 0
Description:
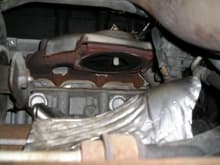
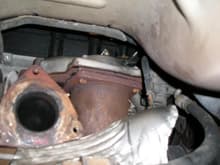
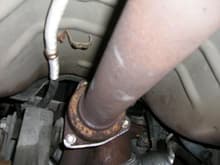
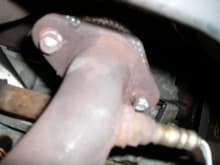
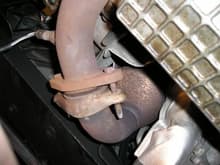
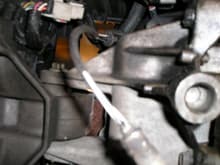
Raise and support the front end of the car. You can use a jack and jackstands or ramps. You don’t need to remove the wheels. Start by removing the engine-to-transmission structural brace. I haven’t shown it in the pictures but if you can’t figure it out (four bolts) then you probably shouldn’t be attempting this project. Use a 15 mm socket. Next, remove the splash shield from the passenger side wheel well. Pull the center part of the push fasteners out about 3/8ths of an inch, then you can pull out the entire fastener. Next disconnect the front and rear downstream O2 Sensors.

Read more »
Sort:
Default
  • Default
  • Most Recent
Here’s a picture of the rear exhaust manifold after unbolting the catalytic converter and laying it aside.  It won’t come out.  Just set it on the crossmember to give yourself room to extract the Y-pipe.  Notice the heat shield on top of the manifold.  It’s held in place with the same four bolts and nuts that hold the cat underneath, which means that when you re-assemble the cat to the manifold, you have to put the four bolts up through the new gasket, the manifold and the heat shield before you put on a nut.  It’s a little tricky but the bolts are not evenly spaced around the cat so it can be assembled only in the proper orientation.  Use anti-seize on all the bolts and nuts when you re-assemble so the next guy has an easier time of it.  When you put it back together, remember to insert the Y-pipe over the crossmember before bolting up the cat.  Connect the Y-pipe loosely at all connections before tightening any of them. To finish the job, replace the structural brace, re-connect the O2 Sensors, replace the splash shield and pat yourself on the back.
Here’s a picture of the rear exhaust manifold after unbolting the catalytic converter and laying it aside. It won’t come out. Just set it on the crossmember to give yourself room to extract the Y-pipe. Notice the heat shield on top of the manifold. It’s held in place with the same four bolts and nuts that hold the cat underneath, which means that when you re-assemble the cat to the manifold, you have to put the four bolts up through the new gasket, the manifold and the heat shield before you put on a nut. It’s a little tricky but the bolts are not evenly spaced around the cat so it can be assembled only in the proper orientation. Use anti-seize on all the bolts and nuts when you re-assemble so the next guy has an easier time of it. When you put it back together, remember to insert the Y-pipe over the crossmember before bolting up the cat. Connect the Y-pipe loosely at all connections before tightening any of them. To finish the job, replace the structural brace, re-connect the O2 Sensors, replace the splash shield and pat yourself on the back.
0 2011/03/24 20:49:52 dcotter057
Despite what the service manual says, you cannot get the Y-pipe out of the car at this point.  The large three-bolt flange will not pass by the rear catalytic converter and the rear engine mount.  In this picture you can see the flange at the left and the rear cat to its right.  Notice the “bolts” holding the cat.  They do not turn.  There are nuts at the top of the bolts.  You must remove these nuts to remove the cat.  There are four holding the cat to the exhaust manifold.  You will be able to see the rear two nuts to remove them, but you must do the front two nuts entirely by feel.  Use a high quality 13 mm socket.  Use a short extension for the right front nut to lift the wrench above the rear O2 Sensor, the top of which is visible in the picture.  There’s just enough room to do this, working from the rear over the crossmember.
Despite what the service manual says, you cannot get the Y-pipe out of the car at this point. The large three-bolt flange will not pass by the rear catalytic converter and the rear engine mount. In this picture you can see the flange at the left and the rear cat to its right. Notice the “bolts” holding the cat. They do not turn. There are nuts at the top of the bolts. You must remove these nuts to remove the cat. There are four holding the cat to the exhaust manifold. You will be able to see the rear two nuts to remove them, but you must do the front two nuts entirely by feel. Use a high quality 13 mm socket. Use a short extension for the right front nut to lift the wrench above the rear O2 Sensor, the top of which is visible in the picture. There’s just enough room to do this, working from the rear over the crossmember.
0 2011/03/24 20:51:09 dcotter057
This is a picture of the connection from the Y-pipe to the rear exhaust system, looking from the rear.  There are three bolts holding the flange.  If you are lucky, you will be able to unbolt these using lots of PB Blaster and your 13 mm socket on a long extension.  I have done this on two Sebrings and both times, two of the three bolts broke.  I was able to drill out the bolts and re-tap the holes (8 x 1.25 mm thread), but you can also just drill out the hole to a larger size and use nuts on the replacement (longer) bolts to hold it together.
This is a picture of the connection from the Y-pipe to the rear exhaust system, looking from the rear. There are three bolts holding the flange. If you are lucky, you will be able to unbolt these using lots of PB Blaster and your 13 mm socket on a long extension. I have done this on two Sebrings and both times, two of the three bolts broke. I was able to drill out the bolts and re-tap the holes (8 x 1.25 mm thread), but you can also just drill out the hole to a larger size and use nuts on the replacement (longer) bolts to hold it together.
0 2011/03/24 20:52:23 dcotter057
This is a picture of the rear cat-to-Y-pipe connection.  Again, use a 13mm socket.  Be careful to use at least a 6 point socket, or if you have them, use Grip-Tite sockets (available from Sears, about $25 for a set) because you don’t want to round off the nuts.  Again, use lots of PB Blaster.
This is a picture of the rear cat-to-Y-pipe connection. Again, use a 13mm socket. Be careful to use at least a 6 point socket, or if you have them, use Grip-Tite sockets (available from Sears, about $25 for a set) because you don’t want to round off the nuts. Again, use lots of PB Blaster.
0 2011/03/24 20:54:01 dcotter057
This is a picture of the front connection.  The bolts in the picture are mounted into the flange.  You will need to turn off the nuts which are not seen in the picture.  Use a 13 mm deep socket and lots of PB Blaster.  If the bolts are ruined by corrosion, you may have to grind them off, drill them out and replace them.  Don’t bother trying to turn the bolt heads; they will not turn.
This is a picture of the front connection. The bolts in the picture are mounted into the flange. You will need to turn off the nuts which are not seen in the picture. Use a 13 mm deep socket and lots of PB Blaster. If the bolts are ruined by corrosion, you may have to grind them off, drill them out and replace them. Don’t bother trying to turn the bolt heads; they will not turn.
0 2011/03/24 20:55:18 dcotter057
This is a picture of the lead and connector for the front downstream O2 Sensor.  The lead curves up from the sensor to the connector.  There is a little tab on the connector that must be lifted to separate the two halves of the connector.  Practice separating the connector that is visible at the front of the engine on top, the front upstream sensor.  Then you’ll be able to separate this one easily.   The rear sensor is similar but more difficult to get to.  You can get two hands onto the front sensor but you’ll be able to get only one hand on the rear one.  If you stick a tiny screwdriver under the tab of the rear one, it will make it easier to separate.

Next, unbolt the front and rear cat-to-Y-pipe connections.
This is a picture of the lead and connector for the front downstream O2 Sensor. The lead curves up from the sensor to the connector. There is a little tab on the connector that must be lifted to separate the two halves of the connector. Practice separating the connector that is visible at the front of the engine on top, the front upstream sensor. Then you’ll be able to separate this one easily. The rear sensor is similar but more difficult to get to. You can get two hands onto the front sensor but you’ll be able to get only one hand on the rear one. If you stick a tiny screwdriver under the tab of the rear one, it will make it easier to separate. Next, unbolt the front and rear cat-to-Y-pipe connections.
0 2011/03/24 20:56:30 dcotter057
 

Top
Chrysler Forum - Chrysler Enthusiast Forums
  • Contact Us
  • FAQ
  • Archive
  • Advertising
  • Cookie Policy
  • Privacy Statement
  • Terms of Service
  • Your Privacy Choices
  • Manage Preferences

© 2026 MH Sub I, LLC dba Internet Brands


When you click on links to various merchants on this site and make a purchase, this can result in this site earning a commission. Affiliate programs and affiliations include, but are not limited to, the eBay Partner Network.