
Fitting a second thermostat...


Thread Starter
|
Senior Member
Joined: Jul 2013
Posts: 885
When I'd altered the flange as described, I'd say it was a snug fit. That Gates one looks good, might need a some persuading with a bit of silicon oil or any rubber grease.
As usual with diesels, all that cold air blasting in isn't necessary. I now have the main (upper) grill blanked off completely, and an easy to remove blanking plate on the lower cowling air scoop. Even with all that blanked off and in warmish weather, it's still difficult to get the temp. gauge to go past the centre. Only traffic holdups give it a ghost of a chance. Switching on the heater makes the needle drop back immediate.
There's one simple reason I've gone to all this trouble: Diesels are quite thirsty during the warmup period, and this is well extended in cold weather. If it's minus 15*C outside, some diesels never warm up at all. 15 miles is not unusual for the warmup in weather that's just plain freezing. So new diesel drivers take note when winter is upon us. Don't imagine there's anything wrong with your motor if it takes ages to warm up. AND is very fond of fuel at this time. E.g. Jaguar S-typeD normal consumption -- 32 to 34 mpgUK: At minus 15*C -- 22mpgUK.
The main problem is engine friction when cold. The boffins say it's 3 to 5 times higher during the warmup. It's worse with a diesel due to high compression pressure. Some 70% of the friction is between cylinder and piston/rings assy. 90% of the wear is at this cold engine time. And don't waste your time and money putting additives in the oil -- they don't work. They just plug-up the oil filter. I'll tell you my other tricks when winter's here.
Leedsman.

Senior Member
Joined: Nov 2012
Posts: 1,782
From: Dumfries....
Mind you if your Auxiliary heater is working your engine should heat up quicker. I've none as it packed in loosing coolant and nearly knackered my engine.
However I've got a 240v coolant heater that I bought many many years ago and never fitted it to a Range Rover that I could fit in place of the Auxiliary heater.
Winters approaching fast so lets keep warm.
Goggs...
However I've got a 240v coolant heater that I bought many many years ago and never fitted it to a Range Rover that I could fit in place of the Auxiliary heater.
Winters approaching fast so lets keep warm.
Goggs...

Senior Member
Joined: Jan 2012
Posts: 1,611
From: UK
I used these lengths of lagging. I cut enough lengths [they expanded to 35mm when on] to obscure 2/3 of the radiator grill. It worked very well, they needed no 'fixing' and never came off, were not worth stealing by toe-rags and were cheap enough to throw away and put new ones on next year. Worked for me, with a built in reverse - if for any reason you need to - just pull them off and you are back to standard in less than 3 seconds. You will notice in the pic I deliberately pulled the previously tight 'V shaped joint cuts' slightly apart on the top piece of lagging to show you on the other two lower strips how, once fitted, they look almost unnoticeable. �3 quid well spent.
In the 60's I was having a pig of a job travelling 100 miles round trip to a remote place [Tan Hill] to fix sky hooks on pylon wires and swapped my Jag for 2 moths for a Moskovitch. The mate who owned the Moskovitch thought he had won the pools. That Moskovitch however had a pull up and down lever that moved a clunky metal blind, the soddin thing went over hill and dale without hesitation with 2 wheel drive and was godsend to me - warm as toast, if it could cope ith the Urals, thed Yorkshire should not be and was not a problem.
- silicone lubricant for use on weather strips, mouldings, trim, rubber doors & window seals etc
- rotate floor mats. or in my case cover the expensive ones with the oversized rubber ones
- check your spare fuel & jumper leads are where you thought they were
- rotate your tyres if you feel like a workout
- if your battery is 'iffy' in November you will be in trouble by January
- if you live in the wilds Amazon have a 150psi 35 lpm 4x4 air compressor for half price
- check the spare and your ability to get the spare out and change it in a hurry, and over inflate by 5psi
- if you live in the wilds, nitrogen filled tyres instead of air for over-wintering is a consideration
- if you live in the wilds, snow tyres or better still mixed ability tyres are a consideration
- instead of a quick check - invest a full 15 minutes on checking hoses and connections and fluid levels
- include power steering pump connections and condition of pipes and hoses and pulley's and belts
- these are for sale for �7.99 in Macro at the moment - I've had the same one for 10 years
- a commercial grade Scotch-Brite pan scrubber and de-greaser will clean the screen
- new wiper blades and washer reservoir additive will provide an effective window cleaner
Last edited by QinteQ; Nov 1, 2014 at 07:40 AM. Reason: more info

Member
Joined: Feb 2013
Posts: 93
From: West Suffolk
What a great and simple idea ---------I have been watching my MPG now that the weather is cooling down------I have been thinking of fitting a new t/stat for some time, but being soooo expensive and a lot of hassle to fit decided to put up with it------we don't do many miles and couldn't justify the cost/work--------I think I can manage your mod quite well
THANK YOU for posting---------------it appears sooo simple
Nigel & Pamala
---------I have been watching my MPG now that the weather is cooling down------I have been thinking of fitting a new t/stat for some time, but being soooo expensive and a lot of hassle to fit decided to put up with it------we don't do many miles and couldn't justify the cost/work--------I think I can manage your mod quite wellTHANK YOU for posting---------------it appears sooo simple
Nigel & Pamala
Senior Member
Joined: Jan 2012
Posts: 1,611
From: UK
I've got access to one of exactly these and, and I made one of these full thermostat housings :
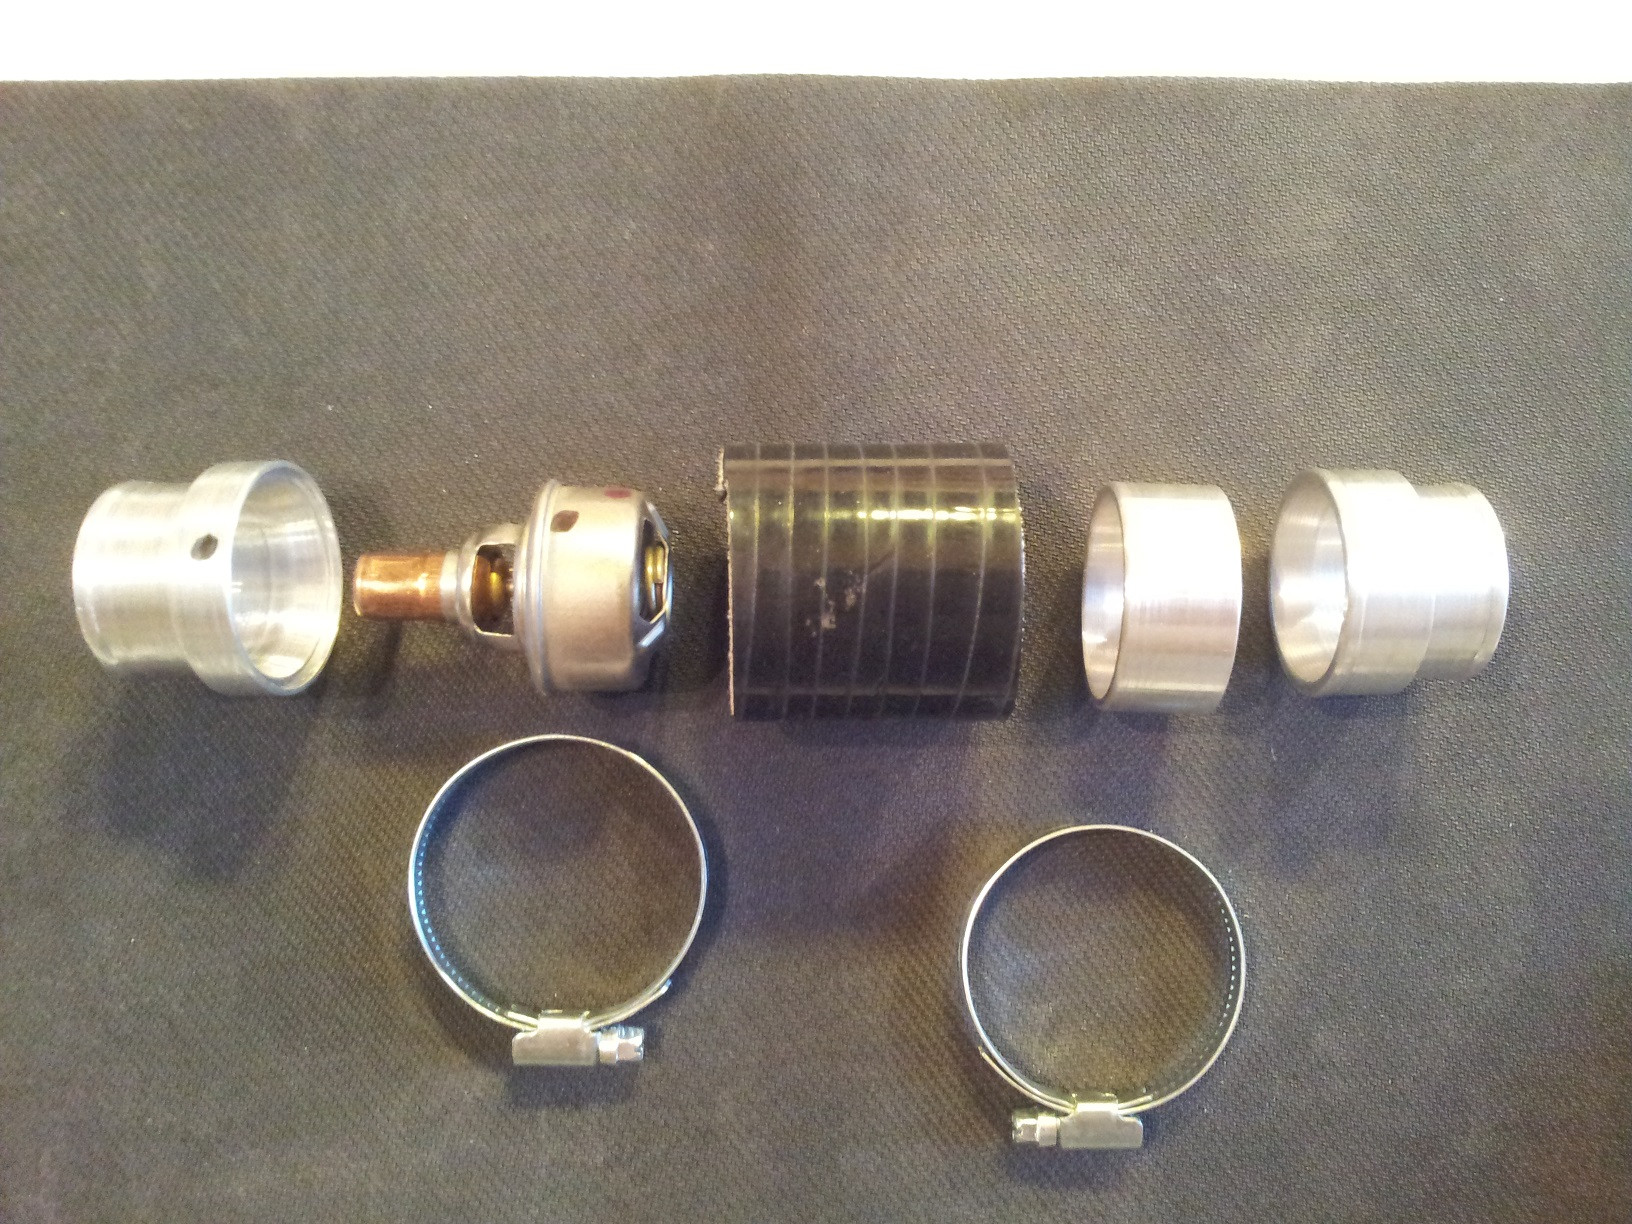
- the finished and assembled piece looks like this :

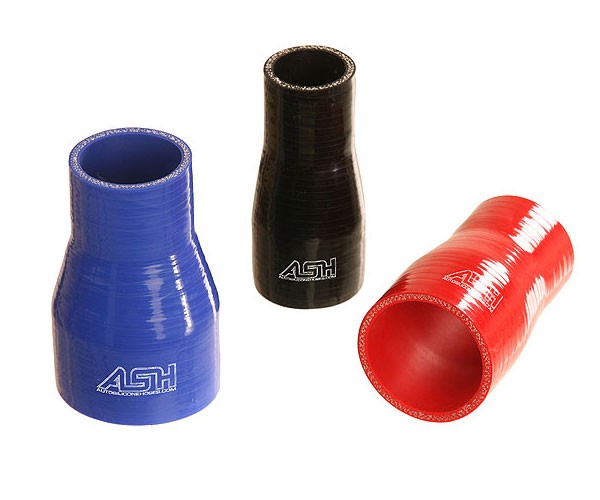
- this from here - 45-38 reducer would make a ready made alternative housing :
- thanks to Leedsman for the motivation !
- I used the stat Part Number TH01489
- from rockauto.uk
- the finished and assembled piece looks like this :
- this from here - 45-38 reducer would make a ready made alternative housing :
- thanks to Leedsman for the motivation !
- I used the stat Part Number TH01489
- from rockauto.uk
Last edited by QinteQ; Oct 24, 2013 at 02:23 PM. Reason: more info

Junior Member
Joined: Aug 2013
Posts: 11
From: Sweden
@QinteQ and Leedsman
The THO1489 is 89 C opening and the QTH210 is 82 C opening , which is original opening temperature for Voyager Diesels (mine is 2,5 CRD if that matters) , or maybe it doesnt matter ?
Thanks Leedsman for this DIY.
Btw do you have instructions for "blanking grill and cowling air blanking" , I understand cowling air is the intake to the air filter , how do you blank it ?
I live in Sweden (cold brrr) and this would help us nordics alot.
Thread Starter
|
Senior Member
Joined: Jul 2013
Posts: 885
Blanking off the main grill is fairly easy; you have to remove four crosshead/phillips screws and two bolts which hold the main plastic grill to the body. This allows you to pull the plastic grill forward enough to do the biz.
Then you have to make up a piece of three-ply to match the shape of the grill closely in a trial-and-error fashion using a large pair of tin-snips or a pad saw. When you've got it right and planed the edges neat with a Stanley plane or rasp, tie it to the front grill with a couple of mediun tie-wraps and suitable holes. The 3-ply bends forwards easily so it fits snugly. If you like, paint it to match the color of your vehicle, or alternatively matt-black as I did. My car is very dark blue as in the pix.
Using the same 3-ply, make up a cowling cover as in the pix, with the slot-shaped piece cut out to install and remove. (And give an air-bleed). You'll need to have some way of stopping this cowling cover from pushing right through, I used some plastic edging I'd had in stock a while fitted over the sharp edges of the plastic, plus some Bostick to keep it on. You'll figure out a sure way of doing this if you're a DIY person.
I don't think the engine air intake is from the cowling area, but I haven't really looked all that hard! Engine air intakes are usually high up so you don't get water in the engine when driving through floods. Remember there is basic air all the time entering via the grills around the front fog lights. (See pix).
I can surely confirm the heater warms up much much quicker than before. You can judge the weather before you set off as to use the cowling block or not.
I'll see if I can post a picture of the relevant screws to remove, but it's dark and wet right now.
Leedsman.
Junior Member
Joined: Aug 2013
Posts: 11
From: Sweden
Thanks for your answer Leedsman.
My poor english did understand that you did blank the air intake (intake to the air filter box, bottom).
With 3-ply , you mean plywood ? A picture would be nice, especially what the cowling is, but take your time.
Thanks.
My poor english did understand that you did blank the air intake (intake to the air filter box, bottom).
With 3-ply , you mean plywood ? A picture would be nice, especially what the cowling is, but take your time.
Thanks.
Thread Starter
|
Senior Member
Joined: Jul 2013
Posts: 885
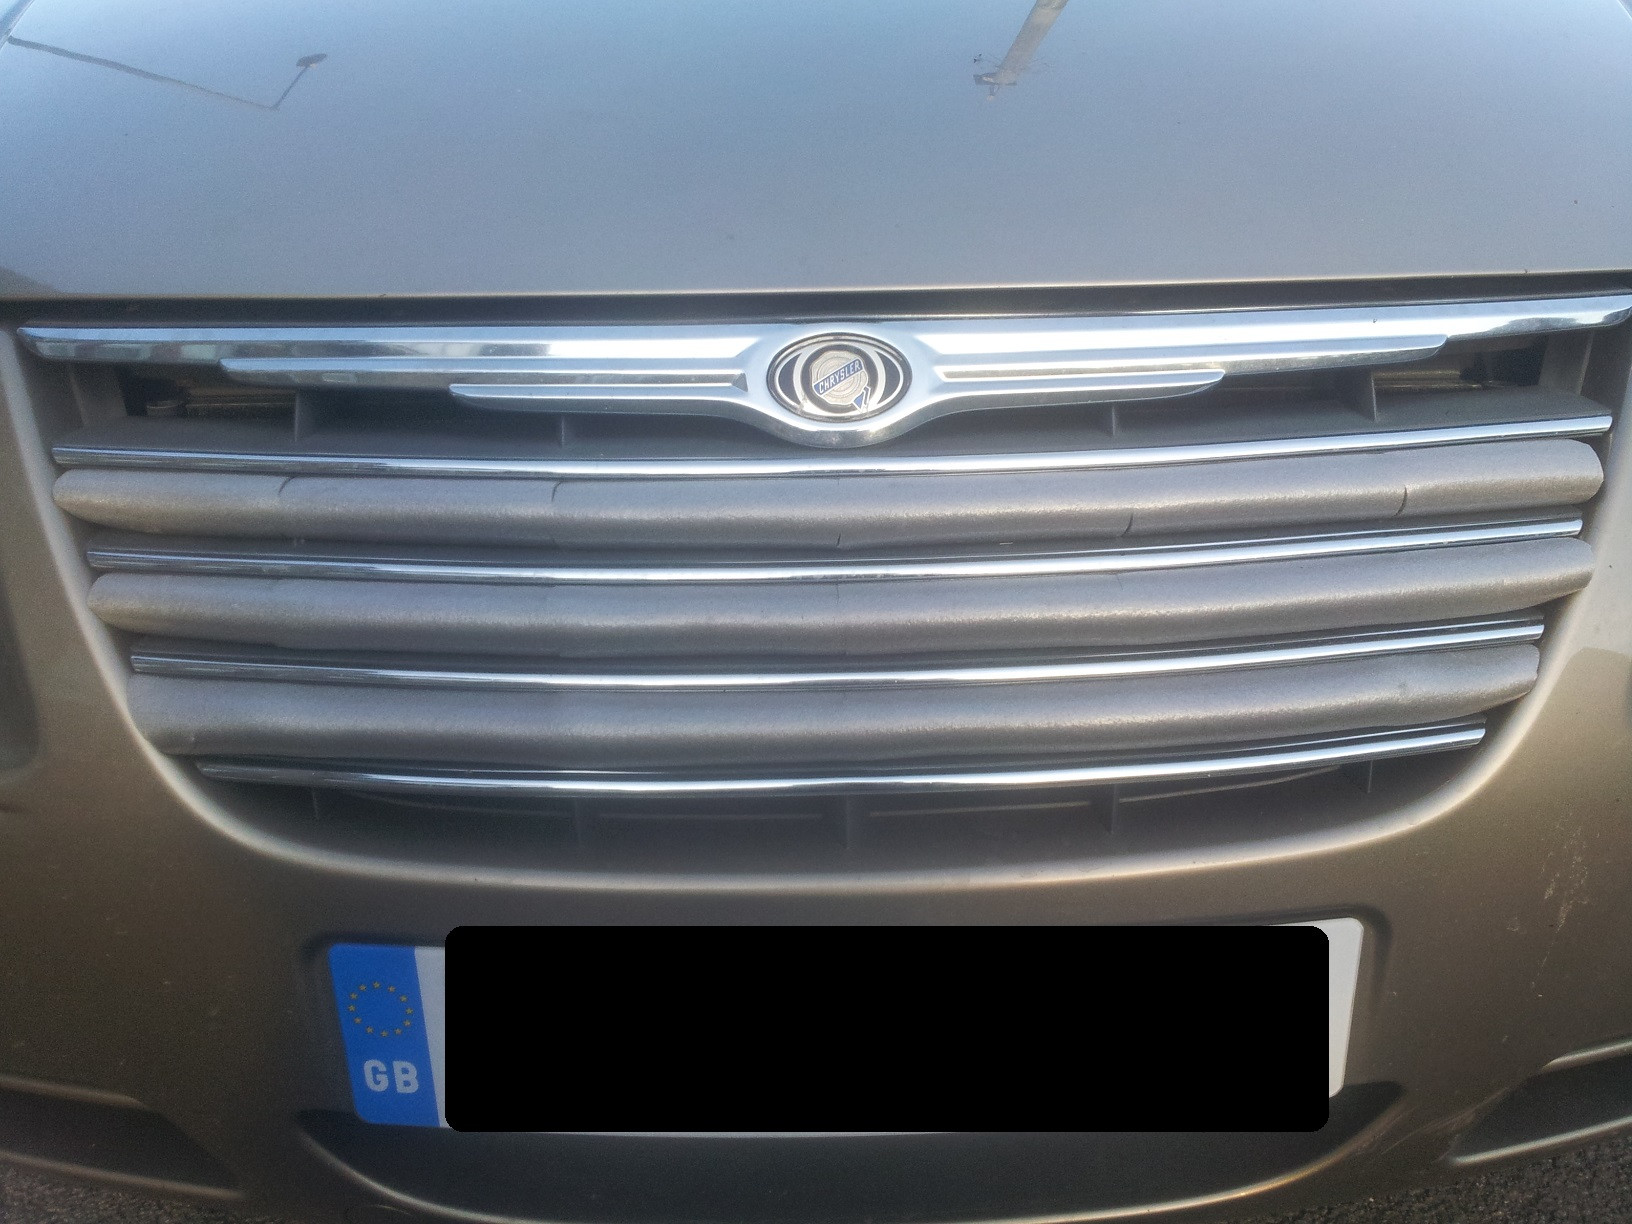
The picture is self-explanatory, but next to the 10mm. screws/bolts there are black plastic retainers -- lift out the centre plug with a small screwdriver or similar, this then frees the rest of the plastic retainer to be easily lifted out.
Note: By "cowling" I mean the cold air entry directly UNDER the radiator grill as seen easily from outside front. I do not mean anything to do with engine air intake. The word "cowling" is often used to mean the cover around the air intakes of jet engines. The area I mean here is the lower cold air entry from outside to the coolant radiators etc. Hope this makes it clear.
Leedsman.
Last edited by Leedsman; Oct 24, 2013 at 05:47 AM. Reason: Clarity.