
My struggles with GV. handbrake -- round two.


Thread Starter
|
Senior Member
Joined: Jul 2013
Posts: 885
As I had a little spare time, I investigated the poor action of my GV's handbrake further, as I still wasn't satisfied.
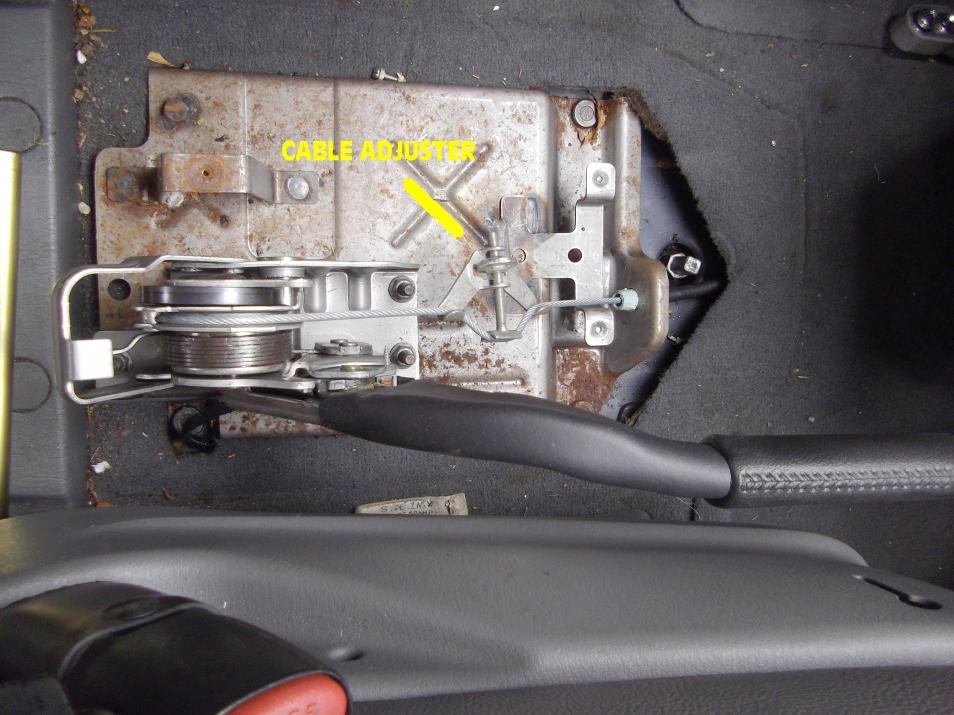
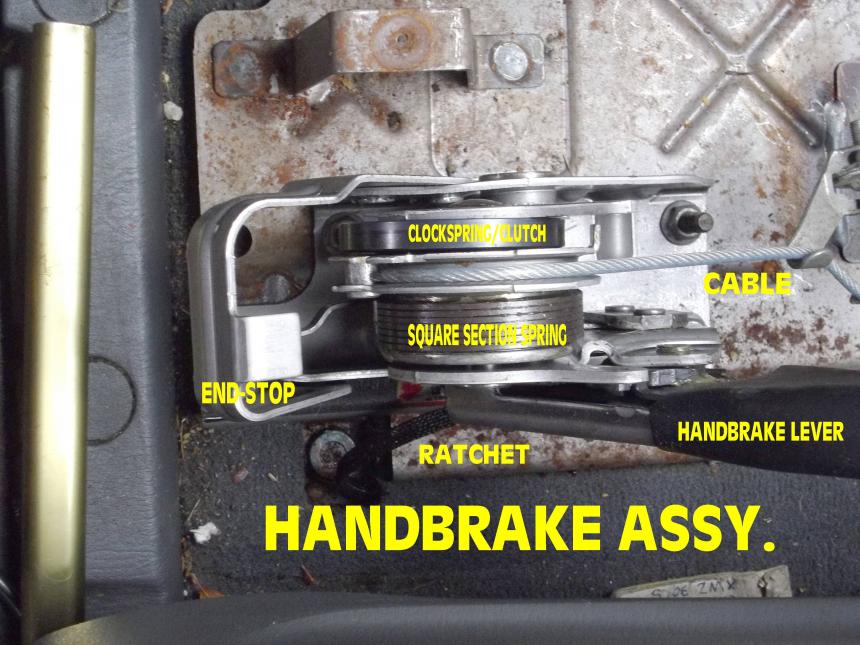
See pictures for the action here.
Taking off the disc/drum for driver's sideUK rear revealed quite good condition of the disc part, but some noticeable scoring of the drum part. This was mystifying because there was nothing about the brake shoes to cause scoring, although there was matching scoring of the brake shoe liners. I concluded someone had changed the shoes in the past without doing something about the scoring. "My man" who had done the brake-cable replacement had not mentioned this at all.
So it was off with the disc/drum, into the vice with it, and some action with a drum sander on the drum face. The idea being to grind-off any cementite or pearlite coating the surface, not to simply 'rough-up' the drum-face. Cast iron is not at all free from carbon-alloying, so it will change nature under heat and pressure, exactly what you get from brakes. It took about half an hour to bottom the scoring with the drum sander. That iron is incredibly hard. At least the bottoming was a good guide to maintaining concentricity (try saying that when you've had a few). The drum sander on the electric drill was worn down two thirds from new after de-scoring, indicating this is not a job you can do by hand. The drum sander was the garnet "flapper" type. Maybe you could use an abrasive wheel on the drill if you have one to hand.
A quick test on reassembly showed an improvement in handbrake efficiency. Before the brake drum grinding, the handbrake would not quite hold the forward drive drag from the torque converter at idle in drive-mode, but after the grinding, no prob. And this on one side only. BTW., you may also use an Allen-key/hexwrench to undo/fix the slider pins, some would find it easier with a little extender-tube. I clean them with some emery-paper plus a licking of graphite grease on reassy.
Moving onto the nearsideUK., I felt further dismay, as "my man" hadn't told me not only were the shoes well-worn, but a piece of the end of one of the liners was broken away. He couldn't fail to have seen it as it was obvious.
This drum was in much better condition however, and only took ten minutes to grind out the light scoring. A set of shoes was �23:50 at a local parts store here in Leeds, not partic. specializing in Chrysler parts. As anticipated, getting the cross-shoe springs back after replacement was a pig of a job. I made it a bit easier by assembling the shoes and top springs (two together) on the floor and jamming the spring ends in place with some twigs from the garden. It's then possible to fit the shoes in back in place without the bottom spring, by using a big screwdriver like a crowbar on the top and a Mole wrench holding the bottom edge of a brake shoe. Then the adjuster and bottom spring can be fitted using an old shoelace on the spring-end as usual. MAKE SURE the depressions in the metal shoe-body are the right way round to fit the little container spring washers (the ones you have to turn through 90* to remove/fit). Otherwise you'll have to take it all apart again...that won't improve your mood, not one little bit. DO NOT chamfer the ends of the shoes as you need all the servo-ing action you can get in both directions here with this system.
I'll report on handbrake efficiency when I've had chance to test it on Whitecoat Hill, Bramley, the same place I did a test previously.
Then onto round three in a day or two where I lengthen the handbrake lever to get more leverage on the system...
Last edited by Leedsman; Dec 2, 2014 at 10:10 AM. Reason: Caution.

Senior Member
Joined: Jan 2012
Posts: 1,611
From: UK
Good work Leedsman.
All levers are :
- fulcrum
- resistance [the work]
- effort [the action we take]
Whilst all levers behave differently :
- the closer the fulcrum is to the resistance the better
- the further away that effort is ~ from the fulcrum ~ the better
That�s why people shaped like humans like the popular wheelbarrows, and crowbars, they each have optimum leverage for a human shape. Is it a given that from your own pic [s] below that the fulcrum is as low as it can get. Is it a fulcrum / lever or is it a pull on ? I like yourself have long argued that the system stinks for a vehicle of this weight and should be changed, either a better handbrick system or much bigger / better shoe surface. I do wonder if reducing effort by extending the length of the lever will cause the clockspring to compensate to continue to do its job which is to protect the under-slung cables from over stretch. The first time you posted the pics below I did wonder if leaving the handbrick the same, disconnecting the clockspring, and using a miniature marine version of a multiplier pulley [turns your 5:1 into a 15:1, or your 9:1 into a 27:1] might be an interesting workaround ?

Senior Member
Joined: Nov 2012
Posts: 1,782
From: Dumfries....
I think you guys are wasting your time and I wouldn't be surprised if someone has sussed it and did the job.
Three things stop this handbrake operating properly, Longer cable to offside shoes, 90deg bend in sheath to offside shoes and Equalizer that is too short.
1st longer cable stretches more.
2nd 90deg sheath shrinks on 90deg bend because it is spring material.
3rd equalizer is just as good as being a solid connection to the three cables.
There is answers here, one is easiest.
Senior Member
Joined: Nov 2012
Posts: 1,782
From: Dumfries....
Equalizer---Can anyone make a bigger one increasing the gap between the two shoe cables. I bet on pulling the handbrake with a bigger equalizer the offside cable travels farther and equalizer turns to show that.
As too cable stretch that can't be fixed unless its pre-tensioned.
Offside cable with 90deg bend, here crush could be lessened by encasing sheath in solid tube, which is not impossible.
As too cable stretch that can't be fixed unless its pre-tensioned.
Offside cable with 90deg bend, here crush could be lessened by encasing sheath in solid tube, which is not impossible.
Senior Member
Joined: Nov 2012
Posts: 1,782
From: Dumfries....
Just thought out another answer to equalising the rear brake shoe pressures that I reckon will work with tests and trims.
After cleaning out drums and shoes, set shoe to drum clearance equally as you would do so both rear wheels lock up in air with same amount of handbrake clicks.
Now thinking about that shorter, straight to brake, shoe cable on nearside, slacken its adjuster between the shoes and note this. Adjust bit at a time till handbrake holds while wheels are on ground. Use hole in back plate to adjust it.
As I have found handbrake can't be tested while wheels are in the air cos its not a conventional car with equaliser in middle of car with equal cables.
Just got to be able to get both sides shoes pulling evenly with a firm handbrake pull is the problem.


Senior Member
Joined: Jan 2012
Posts: 1,611
From: UK
Just thought out another answer to equalising the rear brake shoe pressures that I reckon will work with tests and trims.
After cleaning out drums and shoes, set shoe to drum clearance equally as you would do so both rear wheels lock up in air with same amount of handbrake clicks.
Now thinking about that shorter, straight to brake, shoe cable on nearside, slacken its adjuster between the shoes and note this. Adjust bit at a time till handbrake holds while wheels are on ground. Use hole in back plate to adjust it.
As I have found handbrake can't be tested while wheels are in the air cos its not a conventional car with equaliser in middle of car with equal cables.
Just got to be able to get both sides shoes pulling evenly with a firm handbrake pull is the problem.
After cleaning out drums and shoes, set shoe to drum clearance equally as you would do so both rear wheels lock up in air with same amount of handbrake clicks.
Now thinking about that shorter, straight to brake, shoe cable on nearside, slacken its adjuster between the shoes and note this. Adjust bit at a time till handbrake holds while wheels are on ground. Use hole in back plate to adjust it.
As I have found handbrake can't be tested while wheels are in the air cos its not a conventional car with equaliser in middle of car with equal cables.
Just got to be able to get both sides shoes pulling evenly with a firm handbrake pull is the problem.

Senior Member
Joined: Jan 2012
Posts: 1,611
From: UK